Integrate Pega with Azure Service Bus
Post message to Service Bus Queue

I am a developer working on Pega technology, javascript. I like to learn new and emerging things.
Right now working on Google App engine to build api's for my side project.
This article details about how a message is posted to Azure Service Bus Queue from a Pega application using a HTTP protocol.
Primary focus of this article is on how the headers are constructed and message is sent using Connect-Rest method. The construction of headers logic is same and can be used to other operations not only on Service Bus integration but also with other Azure services (with slight modifications)
Things needed for this integration:
A Pega application (with outbound internet connection)
An Azure Service Bus with at least one queue
Necessary permissions and roles to post message to queue
Steps involved:
Gather and prepare required properties
Construct Authorization header
Call the rest connector to post message
Gather and prepare required properties
In this step, collect all the required properties of service bus queue after all the required permissions are granted.
A http queue url, SharedAccessKey are required to proceed further.
The http queue url can be grabbed from the Queue properties in the Azure portal. It will be in this format.
// Replace __SERVICEBUSNAMESPACE__ and __QUEUE__ with your values.
https://__SERVICEBUSNAMESPACE__.servicebus.windows.net/__QUEUE__
Collect the SharedAccessKey from the Azure portal Service Bus Queue properties. If required, coordinate with your Azure administrator to generate one.
Construct Authorization header
This is the crucial part of the implementation. Azure Rest API services require the authorization header to be constructed and passed in a certain format. This is something common across most of the Azure services.
Go through this documentation on the requirement for constructing the authorization header for Azure services. We will be generating a SAS token for this use case.
"Java step"
In order to generate a SAS token, we will be needing crypto and hashing functions. So to use them, we will need to write some java code.
// Replace __SERVICEBUSNAMESPACE__ and __QUEUE__ with your values.
String strURL = "https://__SERVICEBUSNAMESPACE__.servicebus.windows.net/__QUEUE__";
String keyName = "Send"; // Shared key name. This is a constant required to post a message.
// Replace __SHAREDACCESSKEY__ with your value.
String key = "__SHAREDACCESSKEY__"; // Shared Access Key from Azure portal
long epoch = System.currentTimeMillis()/1000L;
int week = 60*60*24*7;
String ttl = Long.toString(epoch + week);
byte[] keyBytes = key.getBytes();
try {
  String encodedURL = java.net.URLEncoder.encode(strURL, "UTF-8");
  String strToSign = encodedURL + "\n" + ttl;
  javax.crypto.Mac sha256_HMAC = javax.crypto.Mac.getInstance("HmacSHA256");
  javax.crypto.spec.SecretKeySpec secret_key = new javax.crypto.spec.SecretKeySpec(keyBytes, "HmacSHA256");
  sha256_HMAC.init(secret_key);
  byte[] rawHmac = sha256_HMAC.doFinal(strToSign.getBytes("UTF-8"));
  String hash = org.apache.commons.codec.binary.Base64.encodeBase64String(rawHmac);
  String encodedHash = java.net.URLEncoder.encode(hash, "UTF-8");
  String sasToken = "SharedAccessSignature sr=" + encodedURL + "&sig=" + encodedHash + "&se=" + ttl + "&skn=" + keyName;
  tools.putParamValue("sasToken", sasToken); // Put the generated token onto a parameter
}
catch (java.security.NoSuchAlgorithmException e) {
  e.printStackTrace();
}
catch (Exception e){
  System.out.println("Error - " + e.getMessage());
}
The above code will generate a token and put onto "sasToken" parameter. This parameter will be later used in the REST connector to set it to Authorization header.
It is recommended to use Rule Utility Function instead of Java step in the Activity rule.
Call the rest connector to post message
Now, the final part is to call the REST service to post the message to queue. The documentation for the same can be found in this link.
"Connect-Rest rule"
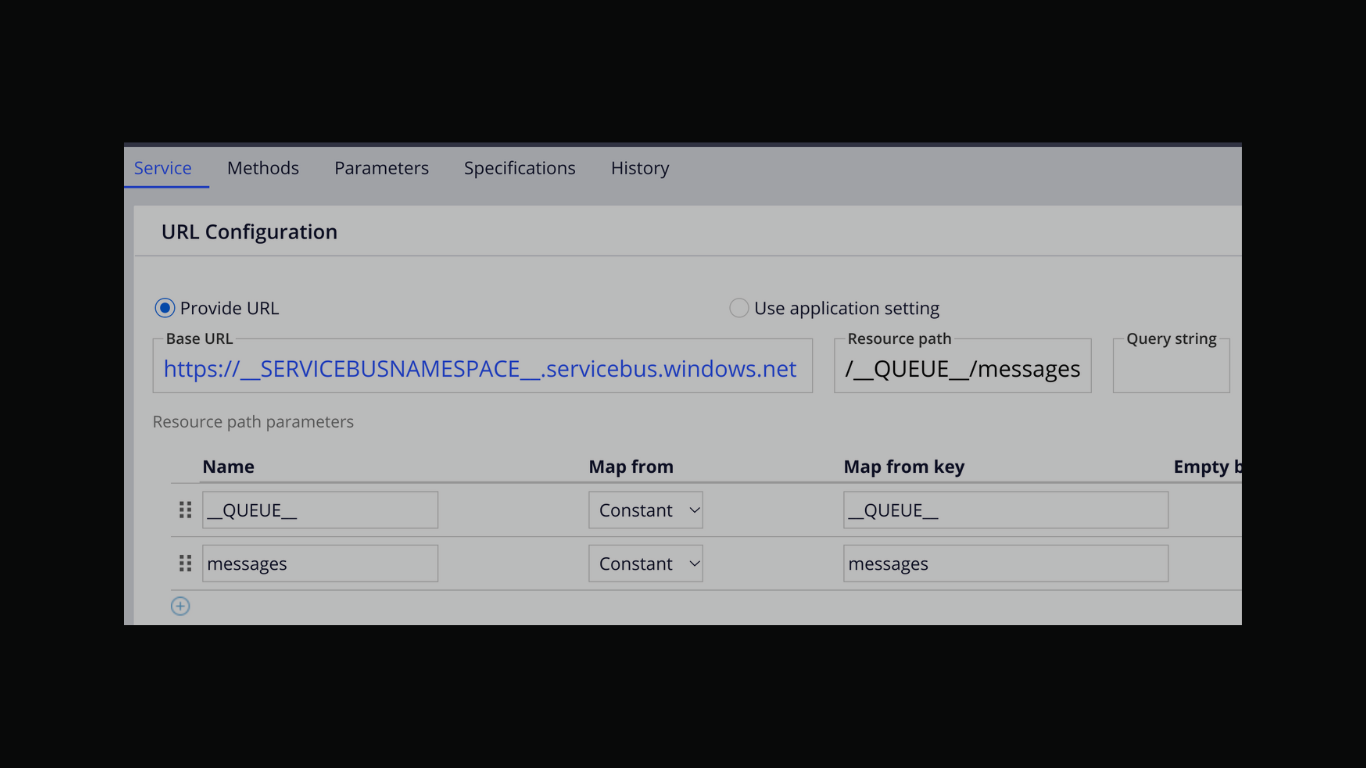
Create a Connect-REST rule and provide the base url and resource path.
// Base url. Replace __SERVICEBUSNAMESPACE__ with your value.
http{s}://__SERVICEBUSNAMESPACE__.servicebus.windows.net

// Resource path. Replace __QUEUE__ with your values.
/__QUEUE__/messages
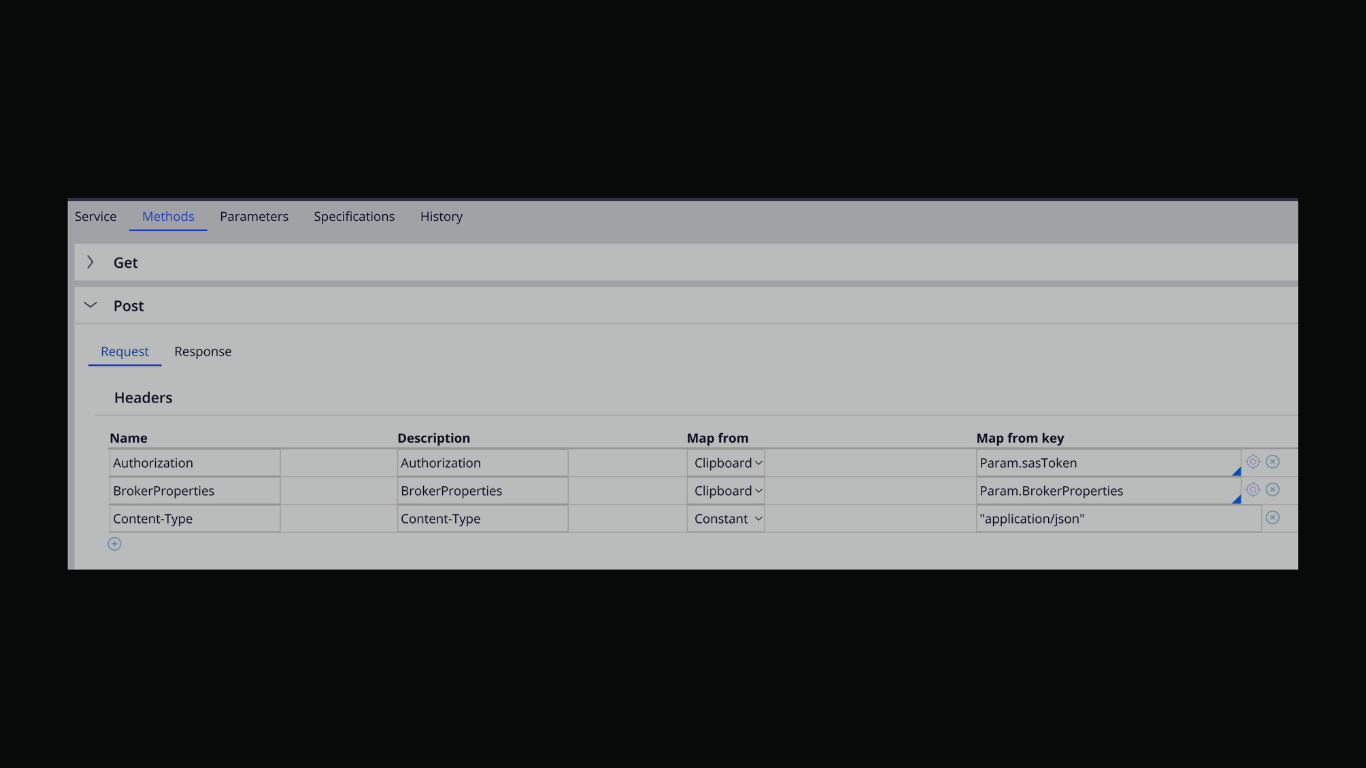
Next, supply the details in POST method. Authorization, BrokerProperties and Content-Type are minimum required headers. Check the documentation for more options. May have variations depending on setup and requirements.
BrokerProperties contain identifiers and some necessary values. Refer to this link for more details.
Finally, set the request body.
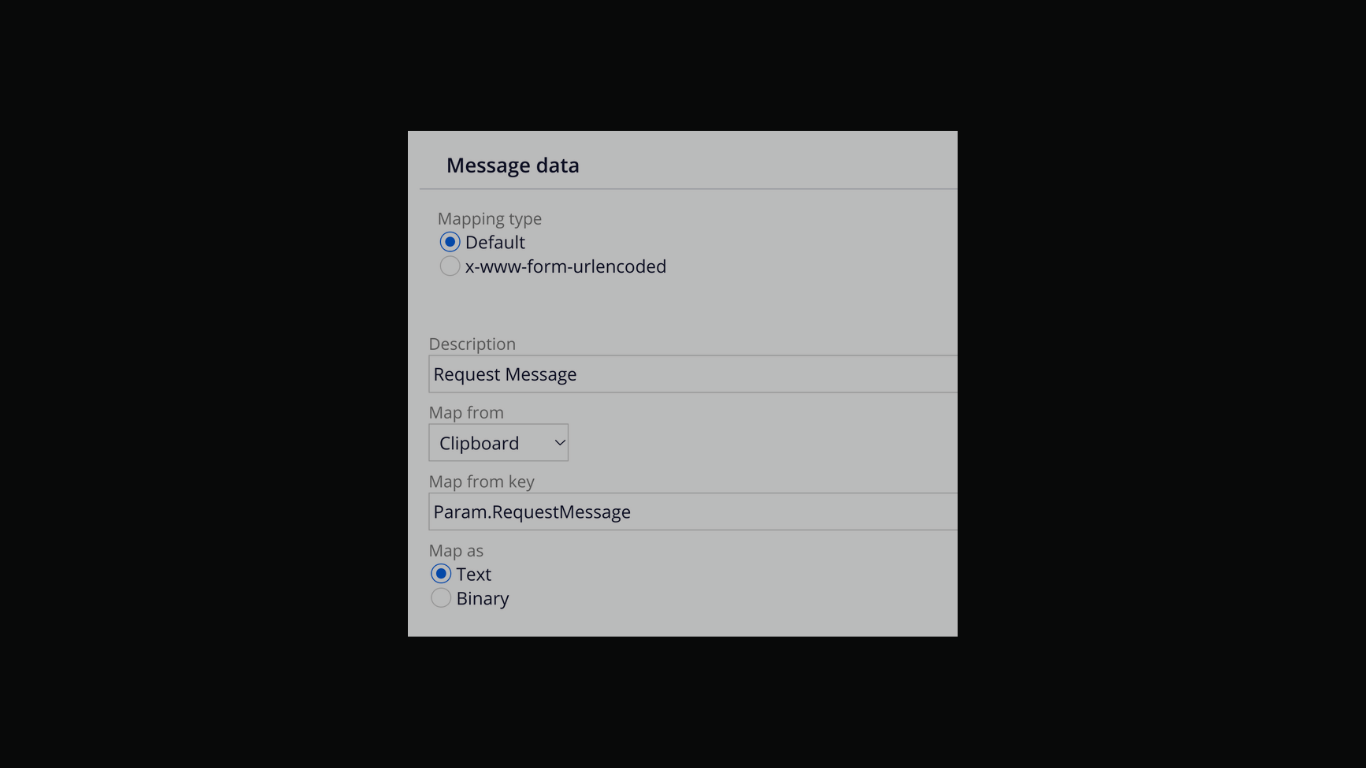
In the above screenshot, the BrokerProperties in the header(Param.BrokerProperties) and the Request message in the Message data(Param.RequestMessage) were referenced through parameters. The values for these parameters were set in the Activity prior to calling this Connect-REST rule.
Both the parameters were set with JSON strings.
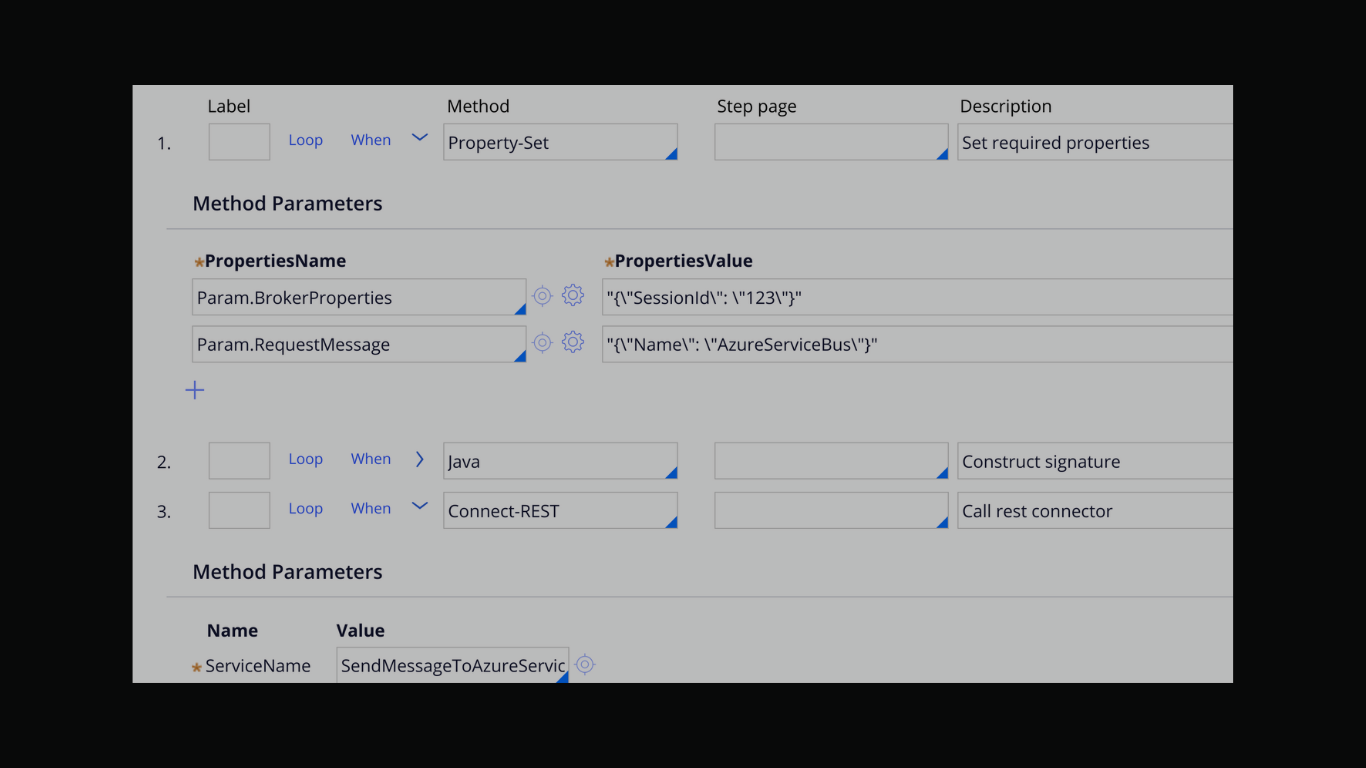
The above screenshot is the activity that constructs required Parameters and call the Connect-REST rule.
First step sets the values to parameters in JSON strings format.
Second step is to construct the Authorization header value (Java snippet in the above section)
Third step is to call the Connect-REST rule with POST method.
If everything is setup correctly and the activity is run, the service will return 201 http status code which is a success.
Similarly, other operations on the Service Bus queues/topics can be performed with slight modifications.
Hope this helps!! Give it a try and feel free to reach out with any questions.
Cheers!!